Technical & Maintenance | Upgrades & Style | Used A8 Buyer's Checklist |
Introduction
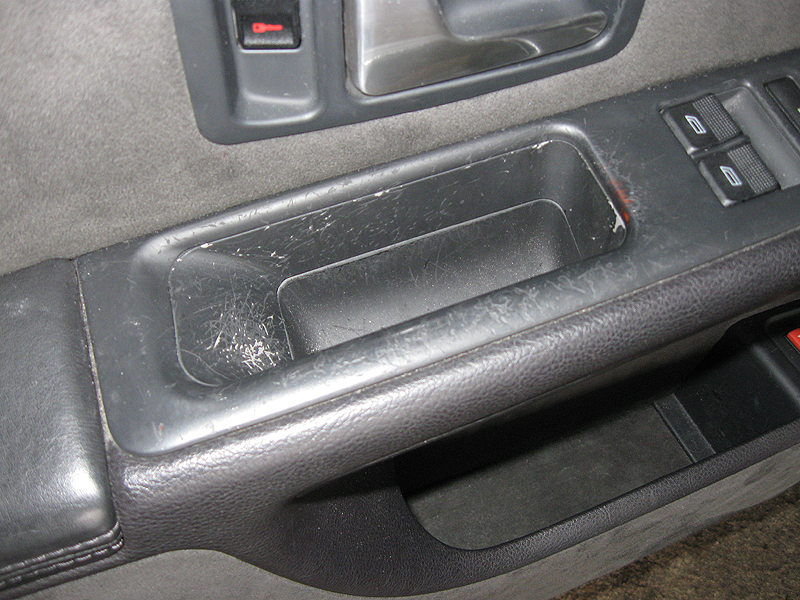
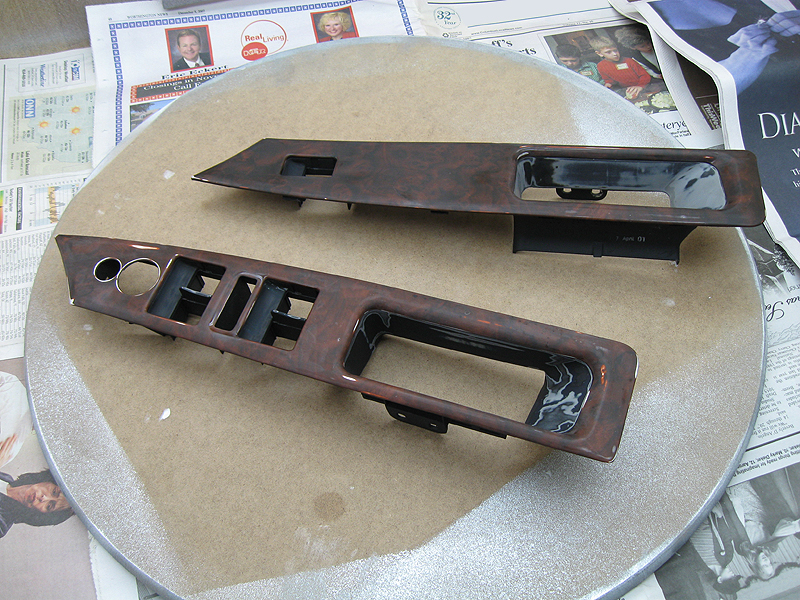
Audi used a black surface finish in the interior of the D2 S8 and other models that remains permanently soft. It can be found on the car's armrests and feels nice to the touch but eventually gets scratched no matter how carefully you treat your car's interior.
The following procedure creates a factory look for these armrest surfaces that is less scratch sensitive. It takes about 2-3 days to complete the following process to allow plenty of time for paint to dry and cure.
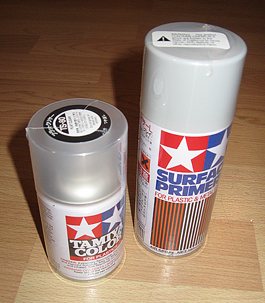
A note about Tamiya: Tamiya spray cans provide a noticeably better finish than regular spray cans from for example a home improvement store. Their finish is very smooth (no spray texture) and is more scratch resistant.
Things you'll need
Surface Refinish
Mirror Controller Graphics (Optional)
Window Controls Connector Labels (Optional)
Procedure
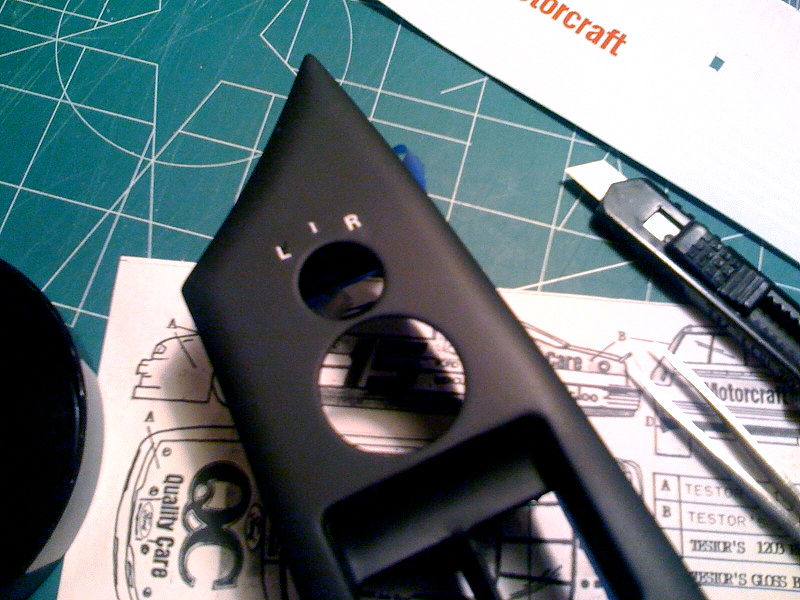
1. Use a plastic paper creaser and/or plastic putty knife to remove the lower part of the armrest as shown in the picture above and remove the two exposed phillips screws. Lift up the side of the armrest surface pointing towards the center of the car.
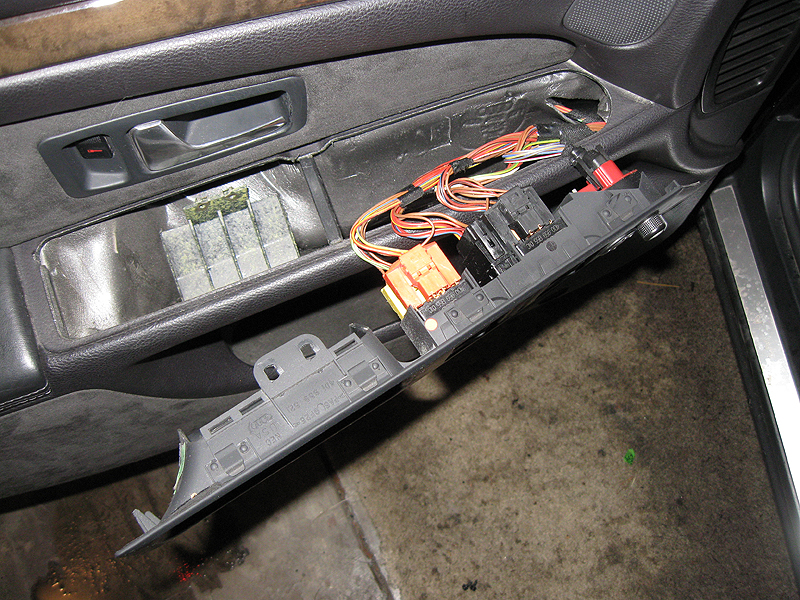
The window controls' connectors can be disconnected from the door without tools; just wiggle them off. The connector to the mirror controls needs two pieces bend outward first before it can be removed by wiggling it out.
2. Remove all switches and controls using a plastic putty knifes and/or paper creaser.
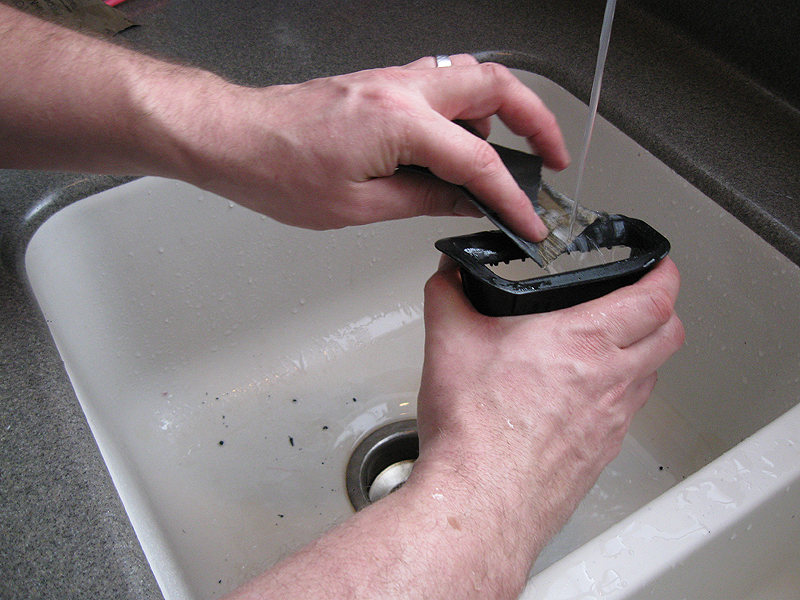
3. Use Grid 400 wet/dry sand paper to sand all the black paint off the armrest's surface while holding it under a slow running faucet with luke warm water. This way it keeps the sandpaper from clogging up with soft paint and makes the paint soft enough to be removed with your fingernails. Stop sanding after you have exposed the fake wood (plastic) finish. Grid 400 sandpaper will get the job done relatively quickly without leaving a scratched surface. Realize that the quality of the final finish depends on removing all black paint and smoothness of your sanding. Sanding one piece takes about 2 to 3 hours.
4. Wash all dirt off under a running faucet with luke warm water and let everything completely dry. You don't want to mix water and primer nor add dust from a towel. Let everything air dry. At this point, your hands should no longer touch those surfaces that will be painted.
5. Apply a couple of thin coats of Tamiya gray primer. You should still be able to see the sanded surface below these coats. After letting it dry for about 5 minutes, visually inspect the surfaces for any spots of original paint that were not removed. If you find any such spots, use Grid 400 sandpaper to remove them and then start at step 4 again (you'll thank yourself later).
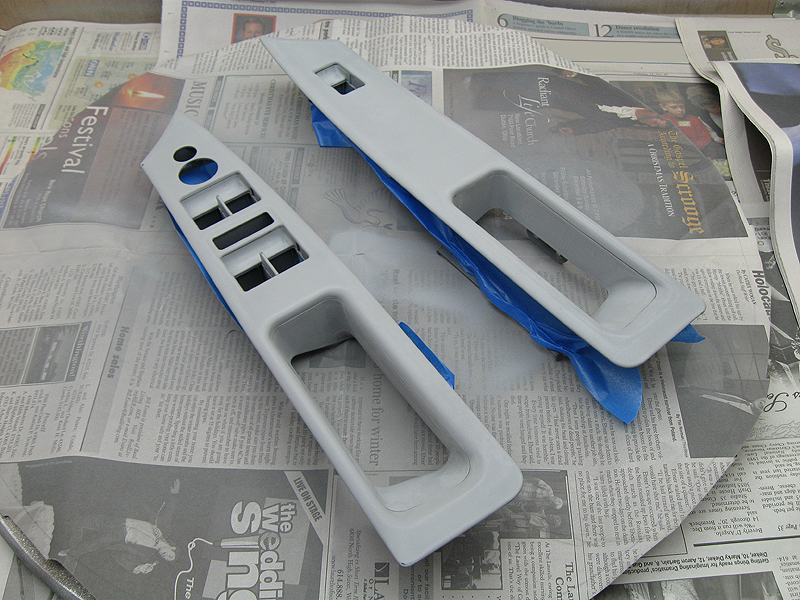
6. Apply one thin coat of Tamiya gray primer, wait a minute or so until surfaces loose their shine and have a matt appearance, then repeat this step four to six times. After the last coat, surfaces should look completely covered and smooth.
7. Let pieces dry overnight. Your patience for this step of the process is essential: it is the foundation for successful completion of all following steps.
8. Use Grid 2000 sandpaper to very softly sand all surfaces, just enough to provide the next coat some grip.
9. Remove dust from all surfaces. Do not use methods that will make the surfaces electro static.
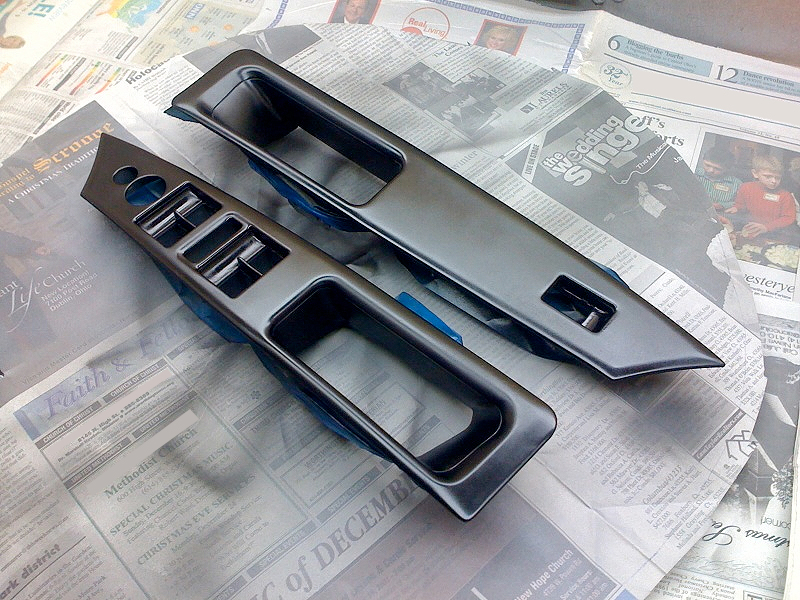
10. Apply one thin coat of Tamiya flat black paint, wait a minute or so until surfaces loose their shine and have a matt appearance, then repeat this step six to eight times. After the last coat, surfaces should look flawless. Use bright light (flash light) to make sure you sufficiently covered all surfaces. If you find a hair or dust, do not touch it but wait until the paint has dried (about 3 hours) and sand it away with Grid 2000 sandpaper, then add a thin coat of flat black.
11. Let pieces dry for about 3 hours. No additional sanding should be needed at this point.
12. Apply one thin coat of Tamiya flat clear coat, wait a minute or so until surfaces loose their shine and have a matt appearance, then repeat this step three to five times. If you are not planning to apply decals for the mirror controller graphics, repeat this step one more time for a total of six to ten thin flat clear coats and let dry overnight before installation of switches.
13. Let pieces dry overnight. Again, your patience for this step of the process is essential: it is the foundation for successful completion of all following steps. Remember that your hands should no longer touch those surfaces that are painted.
14. Use a very sharp small hobby knife to cut a white letter "L", "R" and a stripe out of a decal sheet of your choice. Your model hobby store may have decal sheets to customize model kits of race cars, preferably one for a Lincoln/Mercury team since it may contain a few L's and R's and stripes.
15. Cut off the cotton tip of one cotton swab with a pair of scissors. This will be your tool to position the mirror controller graphics on the armrest without leaving scratches on the painted surface.
16. Use a pair of tweezers to hold the first decal in a small bowl of luke warm water for just over a minute.
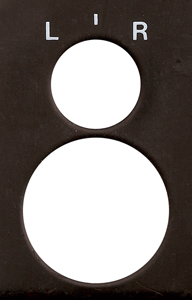
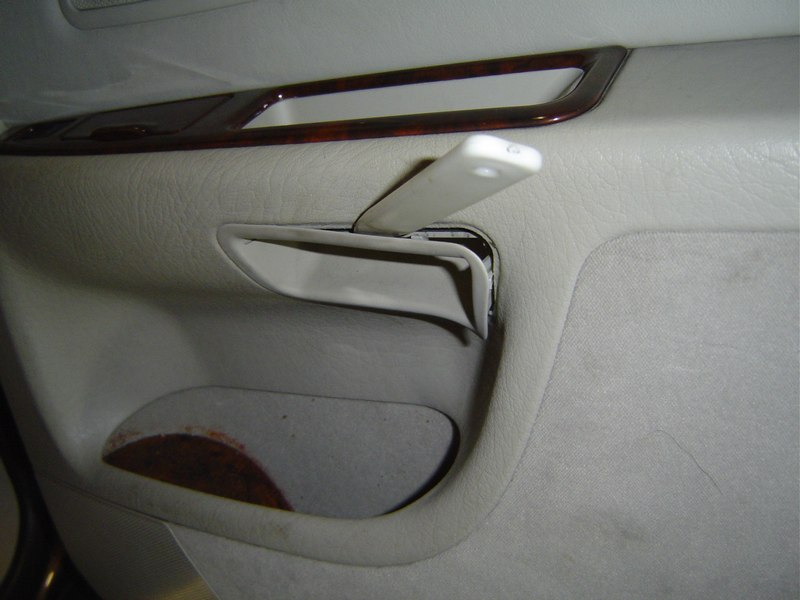
17. Use the cut cotton swab to slide the decal from its transfer sheet and move it to its correct position around the hole for the mirror controller switch. Use the photo above to correctly position each letter and stripe. Use a dry cotton swab to remove water around the decals and use a cotton swab dipped in water to add water.
18. Repeat step 16 and 17 for the two other decals. Use cotton swabs or a paper towel to remove any hairs or remaining water. Do not blow on the decals, they may fly away.
19. Remove any water that is left behind with a paper shop towel (which will not leave fibers behind like a regular paper towel would) and let decals completely dry for about an hour. Again you don't want to mix water and the final clear coat.
20. Apply one thin coat of Tamiya flat clear coat, wait a minute or so until surfaces loose their shine and have a matt appearance, then repeat this step three to five times. Make sure you don't blow away the decals while you apply the first two coats: spray over them from about a feet or so away. Don't worry about the decal curling around the edges: it will flatten (melt) eventually.
21. Let pieces dry overnight before installation. This is a final (and probably hardest) test of patience but a lot easier than having to repeat one of the last couple of steps.
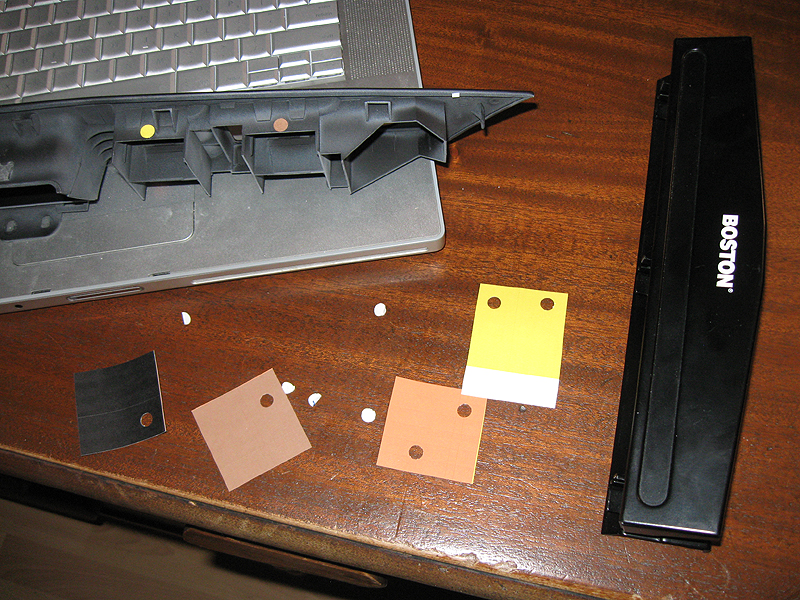
22. To recreate the window controls connector labels, use a computer and color inkjet printer to print out a solid black, brown, orange and yellow square about one square inch in size on the edge of an adhesive sheet of label paper. Use high quality print settings.
23. Remove the part of the hole punch that collects punched paper. Make sure all "confetti" is removed from the holes of the tool.
24. Punch a hole in each printed square to create four adhesive paper circles (6 mm in diameter). If you punch holes with the printed side facing down it is a lot easier to peel off each sticker's back.
25. Peel off the back of each sticker and apply it on top of each original window controls connector label that is most likely covered with primer and paint. Front Left: Black, Front Right: Brown, Rear Left: Orange, Rear Right: Yellow. Front = engine side.
Compare the before and after appearance:

26. Reinstall all switches.
27. To reinstall finished armrest pieces follow instructions in step 1 in reversed order.
Technical & Maintenance | Upgrades & Style | Used A8 Buyer's Checklist |