Oil Cooler Removal and Reinstall By Scot Danrich, with credits to Doug Banning and Steve Wiseman
40 Valve Notes by Bob Dunne, Tom Tuling and BrianC72gt
Overview The following procedure is
to be used on the A8 4.2 32 Valve (ABZ) motor. This engine was found on the
1997 to 1999 U.S. bound A8's. This procedure might also be used for the 3.7 V8
engines, and may be applicable to other 4.2 motors as well.
40 Valve Motor Notes
There are additional notes at the bottom of this procedure for the 40 valve motors found on the facelift cars.
Please consult the Bently manual before using this procedure.
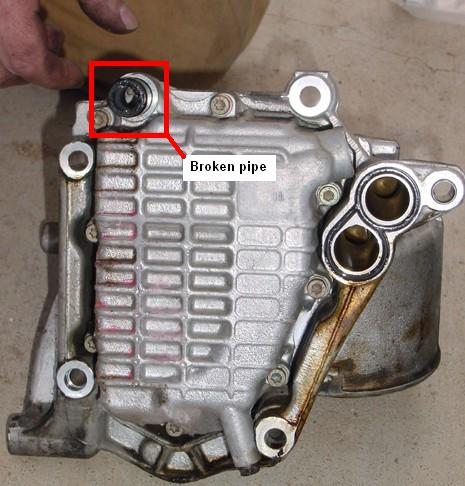
Determining if You Need this Procedure The oil cooler has a plastic pipe with o-rings that carries coolant into the oil cooler, as well as a special "figure 8" oil seal to carry oil in & out of the cooler. The plastic pipe, o-rings, and oil seal degrade over time and begin to leak. Symptoms of a leak are an unexplainable coolant leak (normally resulting in a low coolant warning on the dash) or a small oil leak normally noticed when taking the plastic belly pan off during an oil change. It leaks a small amount of oil, but it can appear to seem like a lot. A small amount of oil looks like a large problem when leaking.
This leak can be found of the front quarter of the engine on the passenger side.
Approximate parts cost: $90.00, including oil filter kit & oil.
Approximate time needed: 7 hours or less.
Approximate money saved doing it yourself: $1,000.00 US. (Including oil change.)
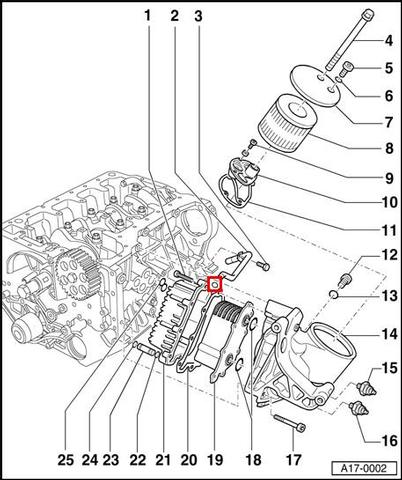
Oil Cooler and Filter Exploded View. Engine block shown upside down with oil filter pointing up. Item 23 is the plastic coolant pipe that will be replaced along with 22, 24 and 25. The third o-ring that is replaced is circled in red, the Bently manual does not number it.
*Information Required*
Your Radio security code. You can obtain this from a dealer, or you can borrow/purchase the radio removal tools. If you do not have your radio security code, you will need to obtain it for your radio to work again.
1 gallon G12 coolant. You can also buy this at a VW dealer.
1 can brake cleaner.
1 roll paper towels.
Procedure:
Drain coolant.
The first part required is to drain the coolant out of the engine. For this, follow steps 1 - 5 outlined in Coolant Expansion Tank Replacement.
Additionally, remove the expansion tank fill cap.
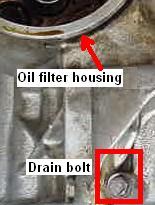
After you have done this, drain the coolant out of the oil cooler via the 10mm bolt. If you use a peice of duct tape to act as a 'chute', you can drain it into the same bucket, without it collecting contaminants.
Oil Cooler Coolant Drain
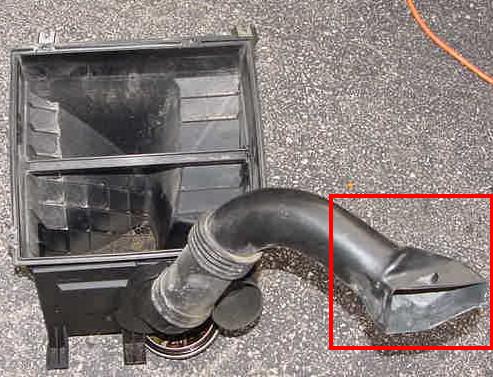
Remove air filter box.
After removing the top of the filter box and associated intake hoses, you will see 2 mounting studs holding the filter box. Remove the nuts. These are the only fasteners holding it.
Filter Box Mounting Studs
Using the flat-tip screw driver, press underneath each clip of the plastic air intake hold down cover to release it.
Air Intake Hold Down
Next, wiggle out both plastic pipes from the rest of the hold down, and remove the filter box.
Filter Box removed
Remove alternator/generator.
(This is why you need the radio code)
Open the trunk. On the passenger side, in the little compartment, remove the little divider by pulling gently but firmly up.
Pop up the floor of the compartment. It's velcroed on.
Use the 10mm wrench to disconnect the ground clamp. This is the clamp closest to the rear bumper.
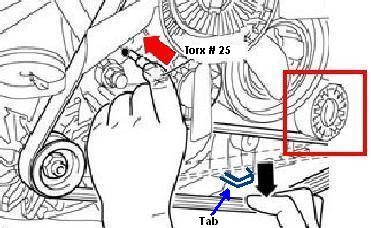
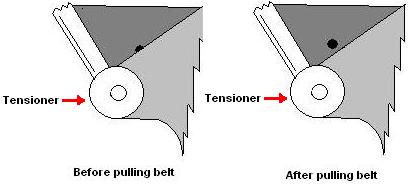
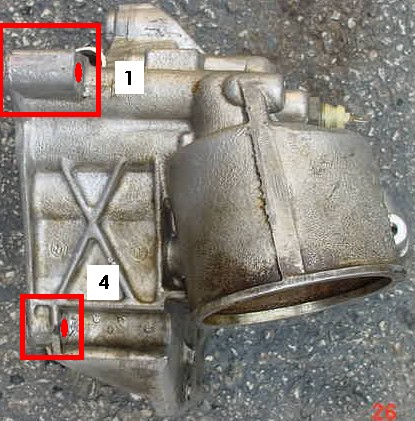
Pull down on the serpentine belt, making sure it is pulled below the tab, and use the Torx #25 to keep the tension off by placing in this hole:
Serpentine belt tensioner hold main view
Serpentine belt tensioner hold detail view
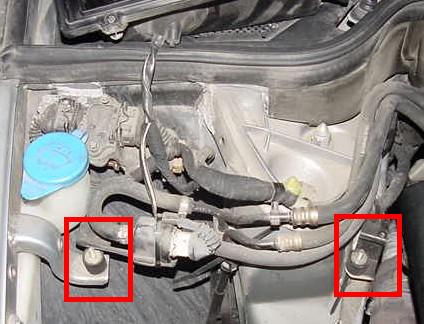
Install a allen wrench or torx 25 bit to hold tensioner to remove belt.
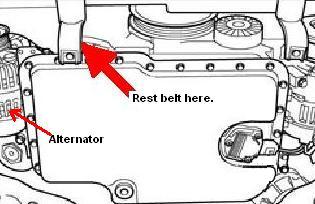
Very carfully, slide the belt off the smooth pulley (not grooved) that is lowest and closest to the driver's side. (See red box above.) This will be the easiest pulley. Take care NOT to remove the whole belt.
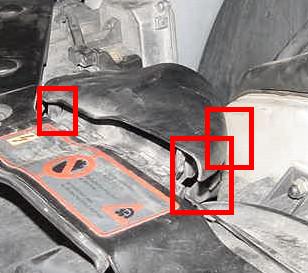
Delicately slide the belt off the alternator. You can keep it out of the way, yet retain the belt routing by resting it on the bracket that is used for attaching the large under-engine plastic cover.
Where to rest the belt
Using the ratchet and 10mm socket, disconnect the main alternator lead.
Using the ratchet and 5/16" socket, disconnect the secondary alternator lead.
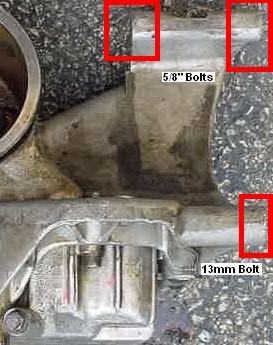
Using the breaker bar and a 5/8" (yes, not metric) short socket, break loose the 2 upper bolts that hold the alternator.
DO NOT BREAK LOOSE THE LOWER BOLT AT THIS TIME.
Alternator mounting points
Continue to use the breaker bar to loosen the 2 upper bolts. It is very tight clearance, but after very few turns, you will be able to unscrew them by hand. Unscrew them completely, and then turn one back in a full turn.
Using the ratchet and 13mm socket, break loose and remove the lower bolt.
Supporting the alternator with one hand, remove the last upper bolt.
If the alternator doesn't drop, swing it back and forth gently until it comes free.
Remove oil filter.
Position the oil drain pan under the oil filter.
Using the 10mm Allen drive, 3" extension and ratchet, break loose the large plug on the bottom of the oil filter. Once loose, remove the tools and unscrew by hand. Allow filter to drain completely.
Using the 10mm Socket, 3" extension and ratchet, break loose the retaining bolt in the bottom of the oil filter. Once loose, unscrew by hand.
Gently wiggle off the bottom of the oil filter housing, and the remove the filter itself. Allow to finish draining. Do not leave any parts or oil filter in drain pan.
After draining, move oil drain pan.
Remove Oil Cooler.
(The meat of the problem)
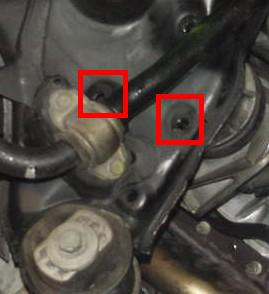
Using the breaker bar and ratchet, 3" extension, and 8mm Allen drive, remove these 2 engine mount bolts:
Engine mount bolts to remove
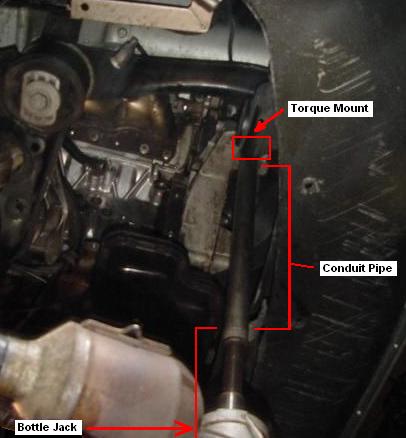
Using the bottle jack and the conduit pipe, lift the engine by placing the pipe on top of the Bottle Jack, and the other end so it supports the large washer of the engine torque support, making sure not to lift the whole car. The most the engine should go up is 3 inches. This allows just enough clearance to remove the 3 top bolts of the oil cooler.
Placement of the bottle jack & pipe
Peel back the boot on the oil pressure switch, and pull the clip off. You may or may not have the wire tied down with a zip-strip.
Continue to tighten the bolts in a circular pattern, a little at a time, until you can see both mounting surfaces meet. You may need to repeat step E-4 1 - 2 more times to insure proper surface contact.
Torque bolt #1 to Torque to 18 ft lbs. (25 Nm). Follow the pattern, torqueing bolts 2 & 3, and then 4 & 5.
Lower the engine via bottle jack, but do not remove bottle jack yet.
Install the 2 engine mount bolts, torqueing them to 37 ft lbs. (50 Nm). If needed use the bottle jack to very slightly raise the engine for alignment.
Install new oil filter. Torque retaining bolt to 18 ft lbs. (25 Nm)
Install a new crush washer (from the oil filter kit) onto the drain plug, and install the drain plug. Torque to 37 ft lbs. (50 Nm).
Reinstall alternator/generator. Torque upper bolts to 33 ft lbs. (45 Nm), and the lower bolt to 15 ft lbs. (20 Nm). Torque large electric connection nut to 12 ft lbs. (16 Nm), and the smaller to 3 ft lbs. (4 Nm
Install serpentine belt, reversing the process in step C-4 and 5 .
Install air filter box and air intake pipes.
Using the gallon milk jug as a funnel to refill the expansion tank (slowly) with the saved coolant. Pay attention to the bleeder screws, and tighten them down when they start to leak.
After pouring about a gallon in, check under oil cooler for leaks.
Continue coolant refill, periodically checking for leaks under oil cooler.
Replace expansion tank cap.
Refill engine with the 8 quarts of oil, if engine code is ABZ or AEW, and 7.5 quarts if it's AKB, AYZ or AUX.
Start car, and check for leaks.
If no leaks, install lower plastic pan under engine.
Reconnect battery.
Drive car up to operating temperature.
Top off coolant as needed,
Recode radio. (If needed).
Set front windows back to express-up as detailed in owner's manual.
Crack a Guinness or three. (I had 4! -or more...)
40 Valve Motor Notes
Thanks to the contributions of audiworld regular posters for the following notes and pictures.
Even though I was about to pull my hair out, I would do this job again. My wife's car has 150k, doesn't leak now but I'm probably on borrowed time.
I made 2 key mistakes:
1) I didn't have the right tool and almost stripped the most difficult bolt. See my pic below which is an 8mm swivel socket and a short piece of 8mm allen wrench. This works great.
2) Didn't pay CLOSE attention to Brian's comment about re-installing the cooler. I wasted hours here. There's an art to getting the cooler in and out. To get it out, rotate it towards the front of the car while pulling down.
To install: the bottom of the cooler must go in first and THEN tip the top part in. Trust me, it will not go in any other way. The pic below is the "HOW NOT TO" reference.
In addition to what's here, search for notes from "BrianC72gt" and "ttuling". I would also add:
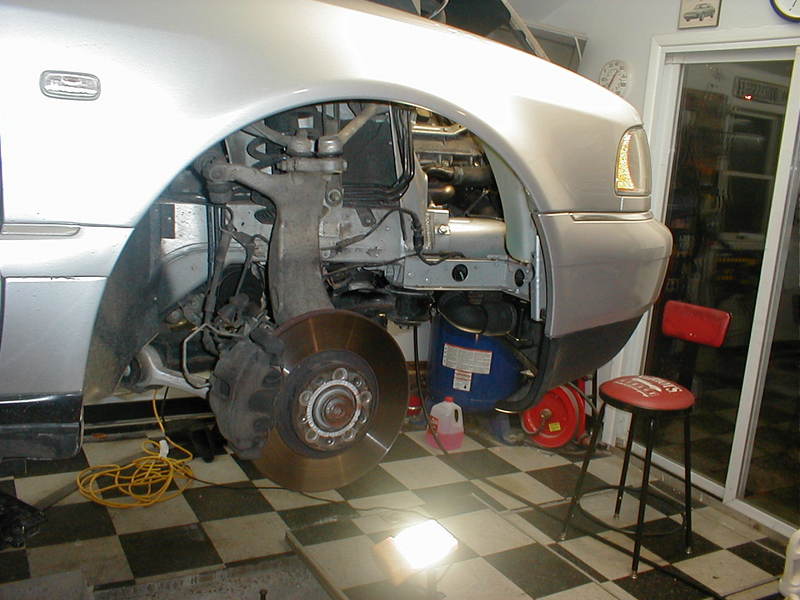
Remove the wheel well liner. There are 5, 8mm hex bolts which need to be removed. The top 2 ones are the toughest. With the wheel liner removed, you can actually stick your head up into the space and see both of them. With the swivel setup you can get them out pretty easily.
Although I didn't do it, removing the front bumper would give you even more room to move around.
Note from Paul Waterloo: I did this job on my 32 valve car when doing the timing belt, had the front end removed and removed the alternator. It was relatively easy. Still challenging, but easier.
Follow the procedure on audipages for the 32v (above). You don't need to do any lifting of the engine.
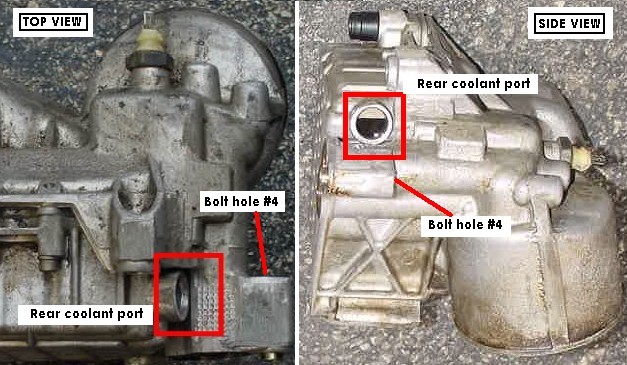
The long metal pipe at the top of the cooler can stay in place during the install/removal. Follow it a couple of feet towards the back of the car and you'll see a 10mm bolt which can be removed for a little more slack.
Definitely change the voltage regulator. Part #028 903 803 E. I don't think there's enough room to do this on the car so you might as well while the alternator is removed.
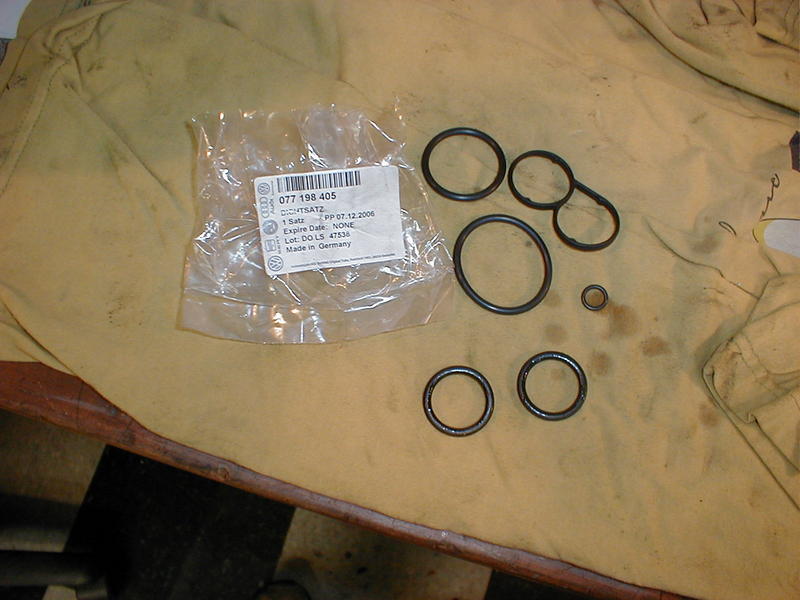
I'm missing one critical pic which I'll add if I can find it. It's one of the oil cooler taken apart on the bench. This is where you'll use seal kit # 077 198 405. This contains all of the internal seals and a small o-ring which is used for the metal coolant drain pipe attached to the cooler.
In addition to the seal kit, you'll need one plastic oil pipe (part # 077 117 411 A). You'll also need 3 additional o-rings (part# 077-121-437). Two of them go onto the pipe mentioned above and the other goes onto another metal pipe
which goes into the front of the oil cooler.
I didn't have any problems getting the torx fasteners removed when changing the internal seals, others have and suggested ordering extras. Based on what I did, a couple of extra hex bolts might not be a bad idea. Four of them are M10x65 and the other short one is an M10x40.
Pictures of Bob's removal and install:
Correct Tool for Hex Removal
Internal Seal Kit
Wheel Well Liner Removed
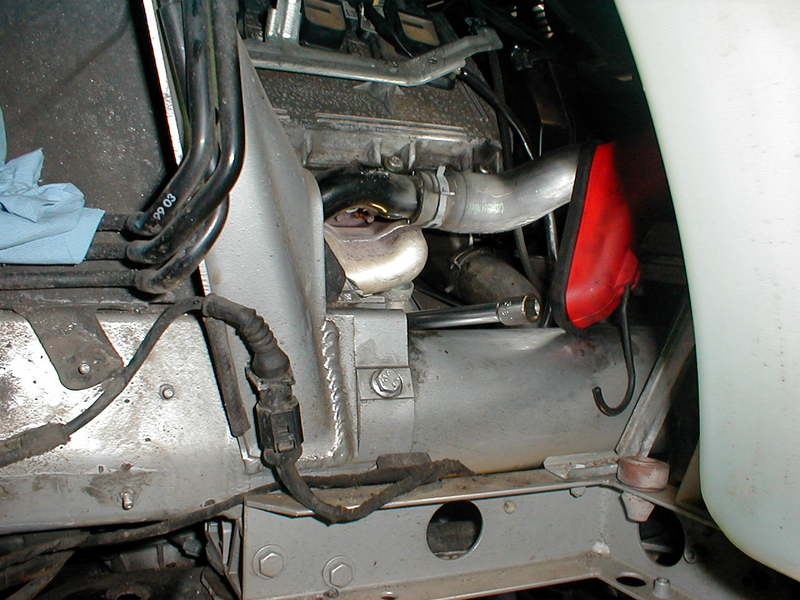
Access to Top Bolts
Don't do it this way! The top has to be tilted AWAY from the block when re-installing.
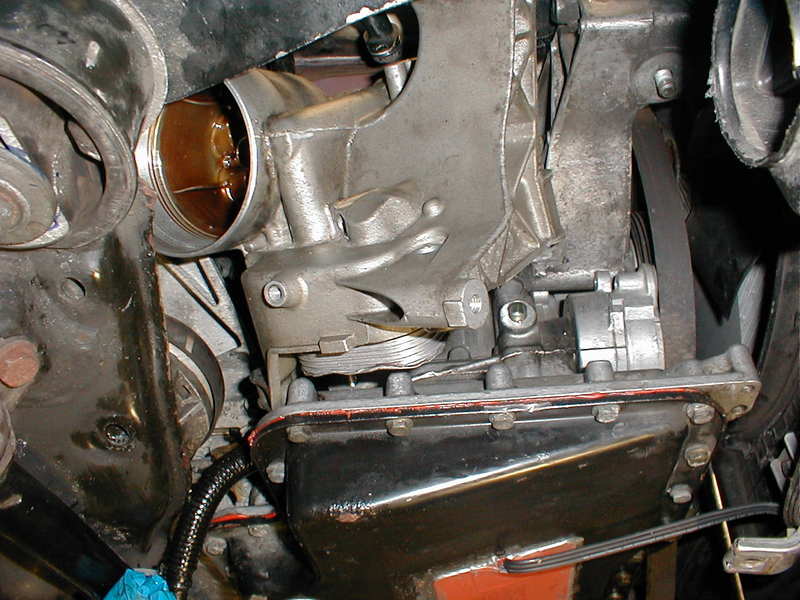
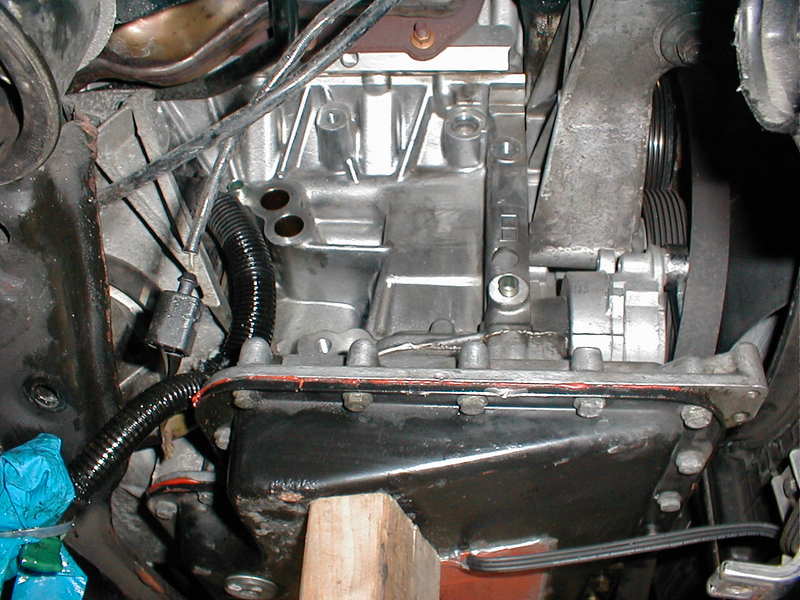
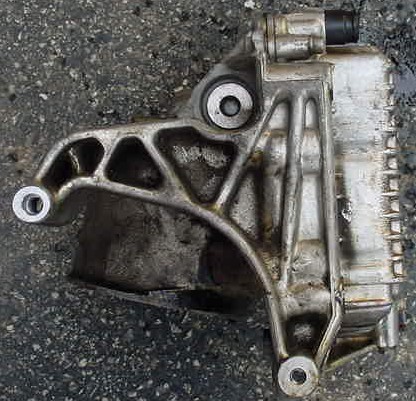
Picture of block with oil cooler removed.
Notes from BrianC72gt
Did the job this weekend with a lot of stops and starts because she who must be obeyed...must be obeyed. Anyhow, the procedure for the repair of the oil cooler "O" rings and plastic pipe is almost identical to that posted on Audipages.com for the earlier 32V engine. The differences are slight, so here follows my rambling observations.
Drive the car up on rhino ramps, disconnect negative battery cable - 10mm box wrench.
From above, unscrew the four screws securing the top of the airbox and remove - straight or phillips screwdriver, your choice, lift cover off, leave the AFM inside and lie it back on the intake or up near the firewall, remove bottom half of airbox by unbolting the 2 10mm nuts at the top of the box closest to the firewall, tip it up back toward the engine ecu box and lay it there...it still has the secondary air pump inside it...secure it out of the way with a bungee if you like.
From below remove front undertray - 10mm socket and straight screwdriver, drain coolant (I didn't), remove the bottom of the oil filter housing with a really really big socket - drain it first if you don't want to get your dress dirty (I didn't..it was a nice dress too).
Still under the car, disconnect alternator wiring - straight screwdriver to pop the rubber cap off the "big" terminal nut - hmmmm 10 or 12 mm nut, unbolt the little terminal nut - 8 mm socket, then pop off the female blade connector - straight screwdriver again or small pliers. Pull off the 90degree duct elbow which feeds cooling air to the alternator, it just slips off.
On the ground in front of the car: Using a 19 mm socket wrench with a longer driver handle on the fixed lug (shaped like a 19mm nut)on the idler pulley bracket, start at the 6 o'clock position and try to push it counter clockwise and hold it there with one hand while sliding the serpentine belt off the alternator pulley. The tensioner pulley is on a spring loaded bracket which is not tightened down in a fixed position, rather, it is held at the proper tension at all times by the spring, so it is free to adjust over the life of the belt,from cold to hot, etc.. this makes it real easy to loosen the belt as described and remove the belt...mind your fingers by the alternator pulley if you slip with the socket and the belt pulls tight...ouch. There is nothing scary about it, the belt tension is not really all that tight, it just feels tough if you use a short wrench or start at the wrong angle..lying on the ground, use a long handle socket wrench at 6 or 5 o'clock a steady counterclockwise push...like butta.
Still on the ground in front, the alternator is secured from the front only by Two bolts, a big long through bolt on top - 8mm allen socket, and a 13 mm short bolt at the 3 o'clock position when viewed from the front. Mine was practically welded in there and took a bit of wrestling to break free - a two hand grab and rock it back and forth affair, maybe a flat pry bar, but be mindful of what you are prying on and against.
Remove the Oil Cooler Assembly. Start of the soul trying tricky bit...remove the electrical plug to the oil pressure sender - a light squeeze with a pliers ought to do it, unscrew the sender - 21 or 22mm open end wrench, remove the five 8mm allen head bolts securing the cooler to the block, remove from below, mount the unit in a vise clamping the alternator bracket ear lightly in the jaws so that the matrix is facing the ceiling,remove the five torx (T25 I think??) screws holding the cooler matrix in place, clean up mating surfaces, replace the gaskets and reverse the process. Ha! If only it were that easy.
Getting the five 8mm allen head bolts out was a bear - 2 from below 3 from above. Of the two bottom bolts, the shorter one is toward the back of the car and is slightly obstructed by the top of the oil filter housing. I found that a LONG allen key was the trick to getting this one out..others have had success with wobbly sockets and the like.
Before starting any of these bolts, I inserted the allen key and then gave the back of the key a medium firm tap with a hammer to fully seat the key (and maybe shock the thresds a little...doubt it)...It is a two hand job: press the key inward with one hand while turning with the other, keep the misalignment to a minimum or you will pop out and risk rounding out the bolt head. The bottom front bolt was pretty easy with an 8mm socket wrench and a variety of extensions and a wobbly head adapter. Again, keep misalignment to a minimum and maintain steady inward pressure to prevent the key from popping out and stripping the bolt head. The top front bolt is another simple one. The middle one is blind, but still a pretty straight shot over the top of the external metal coolant pipe which comes from the back of the engine.
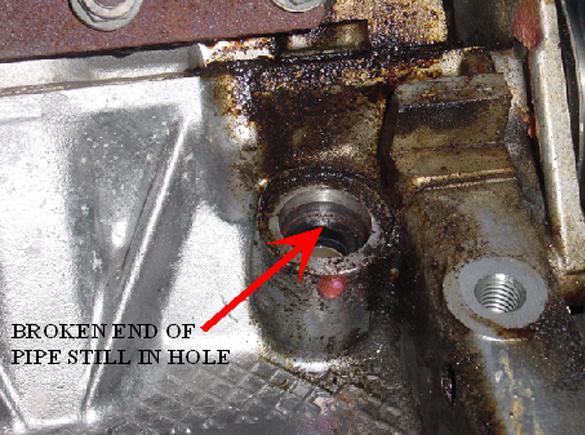
Said metal coolant pipe is secured to the oil cooler body with a single 10 mm bolt. I could not see how to remove the back of this pipe from the back of the engine and by Always Overcharged's account, it is a real bitch to do so. I am lazy. So, instead, I pulled it out of the oil cooler and it had enough slack to move out of the way to get the cooler out from below.
This pipe is really seated into the oil cooler body. I pulled, pryed, wiggled and tugged on it without much success, then I used a steering wheel puller with just the center bolt, slid an ear under the pipe and slowly tensioned the bolt and then it started to budge, continued pulling, prying, etc and it finally popped free. It has a rubber "O" ring which you will also replace. I must also confess to pulling on this pipe with a vise grips, you cringe, but it worked. Had it actually gotten ugly, I would have cut the pipe in half and then twisted it out of ther cooler body and then spliced it back together with hose and hose clamps later. It didn't quite come to that.
The top rear 8 mm allen head bolt tries mens' souls. It is blind, it is tight, and you've got no damned room to manuever. You can see the bolt head... barely...while lying under the car but you can't get the wrench in from below. You can slide the extension bar in from above, but you can't see squat...blind retard wrenching at its finest..an assistant lying under the car giving directions while you try and find the bolt from above would make it easier...maybe. Right about then I was thinking I really should have called Heinz, but there was only one 6 pack of Heiniken and I was fierce thirsty. Scratch one able bodied assistant. Wait, that didn't sound right.
If I had it to do over again, and I pray I don't, I would suggest buying the following items..several identical long 8mm hex keys and several 8 mm sockets. Cut the short head off one key so you are left with a long straight key and then cut the next two keys shorter in...say.. one inch increments and hotglue each one into one of the 8mm sockets. A long naked allen key is much skinnier than an extension bar and can get into tighter spots, the socket makes it easier to turn, but since the space is soooo tight, once you start to loosen a bolt, you need to switch to the next shorter homemade allen socket so you have clearance at the back of the wrench. It really is that cramped. Once you get it out, take hope, getting it out is the hardest part...but only by a little.
Now you've got it out of the car, remove the cooler matrix. I like a torx bit on a long extension bar with a socket wrench. This way you can push down with one hand while applying firm steady pressure on the wrench with the other. All 5 torx bolts came out unscathed this way...thanks to Always Overcharged for the heads up about these bolts, he was not so lucky. So, the extra effort here - mount it in a vise at the big alternator bolt contact points, and steady downward pressure with one hand and loosening pressure with the other - made it easy.
The unit will go back into the car without jacking on the engine block with loosened motor mounts or any other shennanigans, but it will only go in one right way and there are many wrong ways to try. Hard to describe, but if you are under the car and get stuck, read this and you will see what I mean. If you get it into the space but the oil filter mount is tilted outward toward the frame rail, forget it, it is wrong, you will never get the filter housing to tilt down past the frame rail. Take it back out from below and try it with the top of the unit tilted away from the block and the bottom close to it. You may have to rotate it a little, but it will go in this way so un-freakin-believably easy that you will want to dance a jig. Both during removal and reinstallation, be mindful not to bash the fairly fragile matrix against the engine block. It would really suck if this thing sprung a leak.
When you bolt it back up, note that there are two locating dowels - top left and lower right - and the plastic pipe to line up. Tighten it down evenly. If you get it cocked too far out of alignment, the bolts will be a little harder to turn. If they do, loosen the last bolt you tightened by a turn or two and see if that helps. This is where you want to be patient, no rush, in your happy place. Another really bad time to strip or break something.
I didn't have my Bentley available for this procedure as I just switched computers so I don't know what if anything they add to the processs.


 Guinness or three. (I had 4! -or more...)