Cleaning and repacking CV joints can be a filthy and frustrating job. Generally, it is not done properly or thoroughly, and the joint wears out rapidly.
If you have a torn boot, dirt has entered the CV joint.
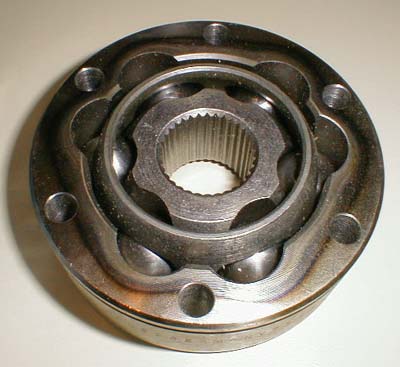
Typical CV joint. If you are going to dissemble it, make sure you mark it with permanent marker or punch marks before disassembly.
Having made a mess of it myself a few times, here's a 13 step CV Sanity plan:
Buy two gallons of mineral spirits (aka turpentine or paint thinner), (2) two gallon plastic paint pails, and a couple of 2" chip brushes (everything costs less than $10 at Home Depot).
Buy two cans of aerosol brake cleaner, about $5 at the auto parts store.
Fill the pails with spirits; 1 gal each.
Cut off the torn boot and immerse the assembled axle end in bucket #1. Clean thoroughly with a 2" paint chip brush.
Immerse degunked axle end in clean bucket #2; clean again in fresh thinner.
Blow or air dry.
Mount halfshaft in vice; clean joint facing up. Inspect balls, tracks, and cage in assembled Rezeppa (AKA: CV) joint for pitting or galling. Shiny spots are OK. Use bright light. If OK, rinse the assembled joint with plenty of aerosol brake cleaner. Air dry.
Note assembly position on axle, then remove axle circlip, spring washer, and assembled joint. Install new boot on axle; fill boot with half of the moly grease supplied with joint kit.
Reinstall assembled joint on greased axle spline, same side in, followed by spring washer (concave side toward joint) and circlip. Seat circlip in groove by giving the circlip a single light wallop with a socket and hammer.
Squirt remaining moly lube into axle side face of joint. Work through joint a bit, but don't make a mess. Slide boot into place and fasten with supplied clamps (or wide plastic zip ties), making sure to degrease boot seating surfaces. Use no hose clamps! They will cut the boot. Note that some CV boots use no clamps at all on axle side of front wheel outer joint. Inspect yours when disassembling and duplicate clamping arrangemnet.
Clean the trans and wheel side companion flanges thoroughly. Put a thin smear of moly just inside the flange cup to prevent corrosion.
Install the axle, making sure all mating surfaces are clean and dry. Use blue Loctite on CV axle bolts; torque to spec (typically 30 lb ft for 8 mm; 45 for 10mm; 65 for 12 mm), using cross pattern.
Recheck bolt torque at next oil change.
A Couple of Notes:
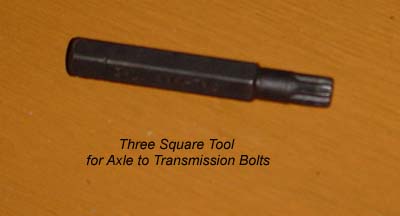
Make sure you have the "triple square" tool on hand before trying to remove the axle. It's not a allen head screw, it's a special triple square tool.
I do not recommend disassembling a Rezeppa (CV) joint. There is just no point in doing so. No, you can't replace anything in the joint, irregardless of what the junkyard rebuilders might do.
Many others have disassembled the A8 CV joint. If you do, be careful to pay close attention to how it is assembled. It can go back together many different ways. If it binds in any direction of movement, it is not correctly assembled.
The aersol brake cleaner step is important. Mineral spirits or solvent leaves a film which moly (and most other modern grease) cannot wet. You need to clean this film off or the joint will not last. Same, by the way, for any greased bearing. Cleaning and repacking sound bearings and joints is worse than doing nothing at all, unless you do it right. Hot water and detergent will also remove the film, but tends to leave rust traces before you can regrease.
When installing the axle back on the car, make sure the axle flange bolt holes are free from grease. This will prevent the bolt from picking up grease when inserting it through the bolt hole. To do this, right before you bolt the axle in, soak a
Q-tip in solvent (turpentine, kersosene, gasoline, degreaser,
whatever) and run the Q tip through the bolt holes in the CV
joint and in the flange. You just want to remove any grease
from the bolt holes so the threads on the fastener are clean
and dry when you torque them. Some people like to use locktite on the bolts, and the locktite will not set up if the bolt has grease on it. If the bolts do have grease on them, there is a good chance they will loosen with time.
The outer joint boot on a front drive car sees the most wear. All will eventually fail, but keeping them clean (grit free) and dry will generally make them last.
Part of the job is cleaning up all the grease that was whipped out of the CV boot when it was ripped. Clean all the suspension components with brake cleaner.
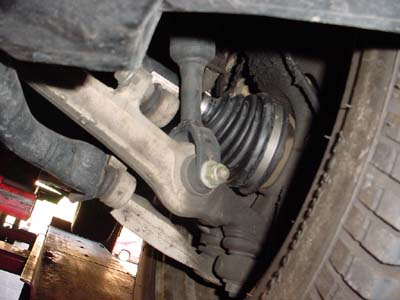
Front axle outer CV boot. This view is from the front of the car looking back. This boot was just replaced. However, the mechanic that replaced it did not clean the grease up from when it was torn. Note how it throws grease all over the suspension components and the wheel well.