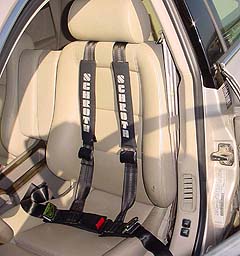
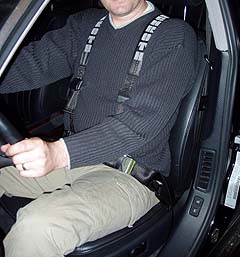
Schroth Rallye 4 asm left 16100 installed in a 2001 Audi S8
Introduction - Why Install a Harness in your A8?
If you'd like to be more "in touch" with the driving
dynamics of your car and increase your safety on the track, the installation
of a Schroth harness is a nice upgrade to your A8. It will prevent you from
sliding on your seat while taking fast corners. You also won't have to push
your hands against the steering wheel anymore during severe braking.
Make sure to order a "Schroth Rallye 4 Quick Fit Harness for Audi/VW"
for either the driver's side (Left) or passenger's side (Right). This harness
can be easily removed after installation and just as quickly put back in:
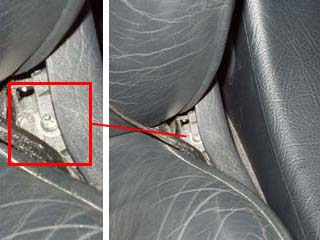
just click it! When removed, only 2 small buckles remain in the car on the
left side of the driver's seat and backseat. They're hardly noticeable: the
one attached to the driver's seat basically disappears between the seat's
leather and trim.
It's recommendable to buy the additional shoulder pads
for more comfort during a track event. So-called Adjuster Grips are
surprisingly not included when you buy a Schroth harness. These grips make
the adjustment of the harness a lot easier. Without the grips you sometimes
need to put your fingers in the looped end of a belt in order to loosen the
harness before taking it off.
Harness adjuster grips and harness pads
Tools Required for Installation
The installation of the “Schroth Rallye 4 Quick Fit Harness for Audi/VW” requires only a couple of tools:
Medium and large Phillips head screwdriver to remove seat trim.
Short Phillips head screwdriver to remove screws under the driver's seat.
Adhesive tape to attach screws to screwdriver.
Socket wrench with extension and 17 mm socket to remove and secure belt anchor point bolts.
Bench vise and hammer to bend metal end of small Schroth belt buckle used in the rear.
Small mirror to locate screws located under the driver's seat.
What is Installed
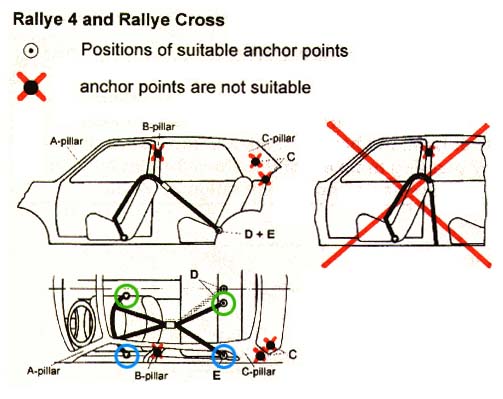
The illustration below shows the anchor points used for this harness.
The only thing permanently installed are 2 small belts that are piggybacking
on 2 existing anchor points located on the left side of the interior
(indicated with blue circles). The other right half of the harness plugs into
the existing set of seatbelts (indicated with green circles).
Step 1: Remove Seat Bottom
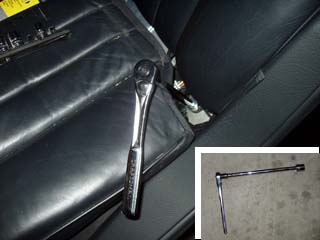
On each side of the car, there are two pieces of scored carpet close to the lower front part of the backseat that need to be peeled open. This allows access to the screws that hold the backseat in position.
While removing the two screws, put your fingers behind the washer so it doesn't disappear behind the carpeting somewhere. In the picture above, notice one of two pins that fit into holes under the backseat.
After removing the screws and washers, lift the front of the seat as shown in the picture above. Move the seat a couple of inches towards the front of the car. Do not try to take the seat out completely since there is wiring connected to it.
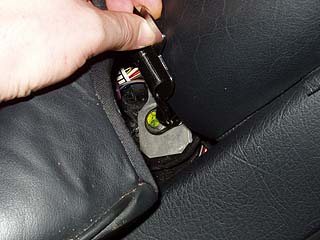
Step 2: Unbolting Seat Belt Anchor Point
Use a 17mm socket with extension to remove the 17mm bolt. The bolt may be marked with yellow paint.
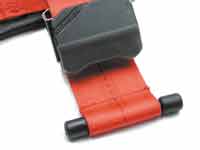
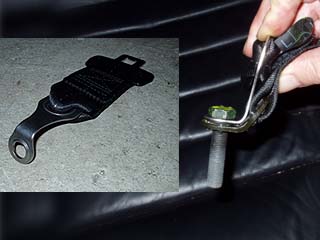
Step 3: Bending Rear Buckle Attachment
Make sure you bend the correct buckle. There’s an easy way to distinguish it from the one used in the front. The buckle that needs to be bend has a square hole and not a rectangular hole in the chrome metal part that goes into an orange seatbelt connector.
Place the end of the buckle attachment in a bench vise. Notice the hole in the attachment has a raised edge. Bend away from the side that has this raised edge. Bend it by about 80 degrees, applying force with hands and/or a hammer.
After bending the buckle attachment as shown in the picture above, put the anchor point bolt through the small Schroth harness buckle and then through the factory-installed rear left seatbelt anchor.
Step 4: Fastening Rear Buckle Attachment
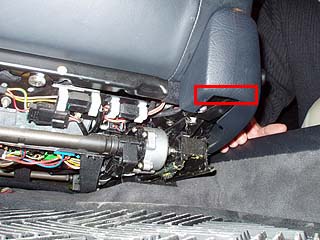
With the socket wrench, securely fasten anchor point bolt while ensuring that the belt of the small rear Schroth buckle can run between the seat and the backrest.
Step 5: Install the Seat Bottom
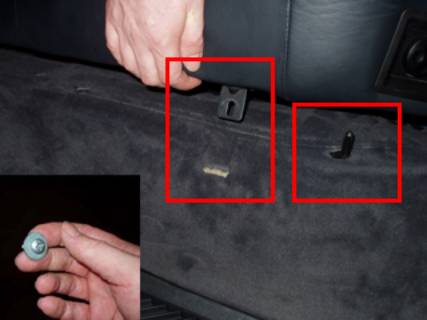
Make sure that the rear seatbelts and connectors are positioned correctly while moving the seat back in position.
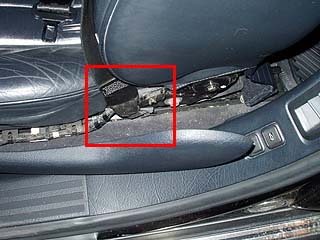
Push the part shown in the picture above (within the left red rectangle) through the seam in the carpet it came out of. If necessary, bend this part a little towards the rear of the car so it can slide through this seam. Make sure that the two pins on the floor slide into the corresponding holes in the bottom of the seat.
Securely fasten the two screws and washers.
Push carpeting back into place.
Step 6: Partial Removal of Seat Side Trim
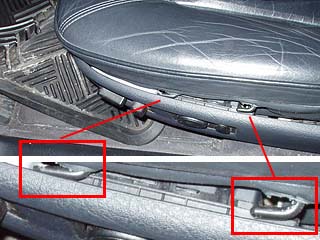
The picture above shows the bottom back cover of the driver’s seat. This cover seems to be kept in position with elastic bands and two flaps that slide into receiving parts. Feel around to get an idea of how it is supposed to go back in later. Of course the passenger’s seat is a good reference for that.
Pull the seat’s bottom cover out far enough to gain access to screw #1 shown on the left side of the picture above.
Remove screw #1.
The picture above shows screw #2. It is located on the door side, between the backrest and bottom seat of the driver’s seat, on the door side.
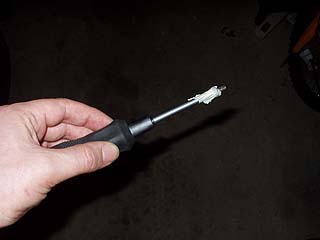
Remove screw #2 only half way. Attach the screw to the screwdriver with some adhesive tape to prevent it from falling to some unreachable spot in the seat.
Remove screw #2 completely.
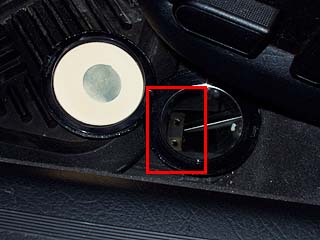
The picture above shows the bottom of the driver’s seat but does not show screws #3 and #4: even from this viewpoint they are not visible. The red rectangle indicates the location of these screws.
The picture above shows the hole where screw #3 and #4 were positioned. Use a small mirror (in this case a makeup compact) to see which screws need to be removed.
Remove screw #3 and #4. (The Bentley manual describes only one screw to be removed here. The car shown in these pictures needed 2 screws removed.)
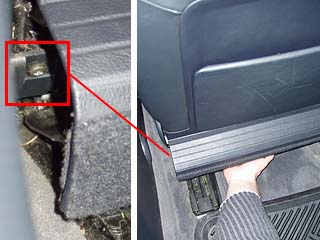
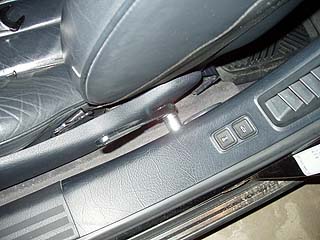
The picture above shows plastic trim on the left side of the driver’s side.
After all 4 screws have been removed, slide the seat trim about a half-inch towards the front of the car. This slides the trim off the two hooks shown in the picture above. At this point the trim can only be removed a couple of inches away from the seat since it has wires connected to it.
Step 7: Installing Front Buckle Attachment
The picture above shows the seat trim removed. The red rectangle indicates the location of the bolt that anchors the factory-installed seatbelt. Remove bolt with a socket wrench (17mm socket).
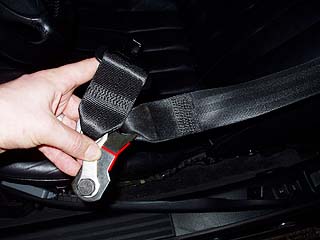
The picture above shows the small Schroth front buckle and the end of the factory-installed driver’s seatbelt.
First put the bolt through the small Schroth front buckle (raised edge around the hole against the head of the bolt) and then through the anchor of the factory-installed seatbelt anchor (as shown in the picture, the end with the belt running through is angled away from the small Schroth front buckle).
Securely fasten anchor point bolt back in the same place as it was removed from.
Step 8: Installing Driver’s Seat Trim
Follow the instructions in Step 6 in reversed order.
Review some handy tips below for re-installing the driver’s seat trim.
Attach screw # 3 with adhesive tape to a screwdriver to prevent it from falling to an unreachable spot in the front seat.
To keep the two holes for screw #1 aligned, put something (in this case a socket wrench with 17mm socket) in between the seat trim and the trim surrounding the B-Pillar of the car body. This makes it easier fasten screw #1 again.
Results: More in Touch with the Dynamics of Driving Hard
After installation, refer to the instructions provided with the Schroth harness to properly fit the harness to the driver’s body. Enjoy an enhanced driving experience!
Tip: Make sure the driver’s side door is not opened all the way when putting on the harness: after your body is all strapped in, you can’t close the door by yourself because your arm will not be able to reach for the door handle! :-)