Tools Required
1 Large bucket to catch the engine coolant
1 Small bucket to catch the windshield washer fluid
10 mm allen wrench to remove bumper bolts
6 mm allen wrench
Metric sockets
Screwdrivers
Procedure
Jack the front end of the car up, place on jack stands. Remove the belly pan by removing fasteners and plastic pan.
Remove both lower outer grill pieces by prying out with a screwdriver.
Place bucket under passenger side of bumper. Loosen hose clamp on passenger side lower grill. Disconnect hose and the windshield washer fluid will drain out. Open the fill cap to vent the system.
Pop out the small pin holding the alternator ventilation duct to the bumper with a screwdriver and pull it free (right next to the windshield washer fluid connection).
Pop out the inner fender (both sides) at the forward part of the wheel well where it tucks in behind the bumper. Just get it started by prying out, and then work it out to the top of the bumper. You should be able to do this with your hands (wear mechanics gloves).
Unbolt the bumper using the 10mm allen head wrench or socket end, do both sides. You can see them if you lay on your back, they are vertically mounted into the bumper.
Remove both bumper bolts with 10mm allen head wrench.
Pull the bumper forward, it comes out like a drawer in a dresser.
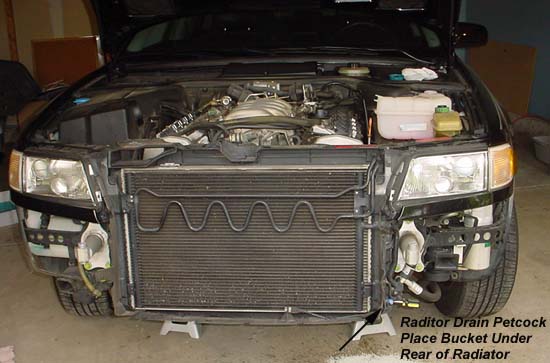
Drain the coolant. This is accomplished by placing a large (5 gallon) bucket under the rear of the radiator and opening the petcock on the side shown in the picture below. Open the coolant expansion tank fill to vent the system.
Bumper removed, drain the radiator next.
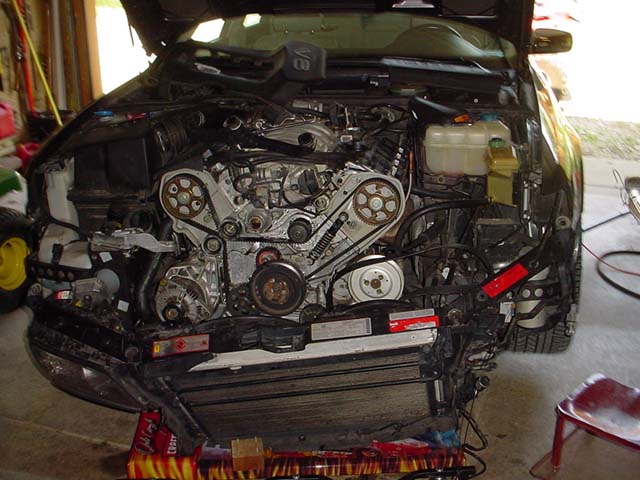
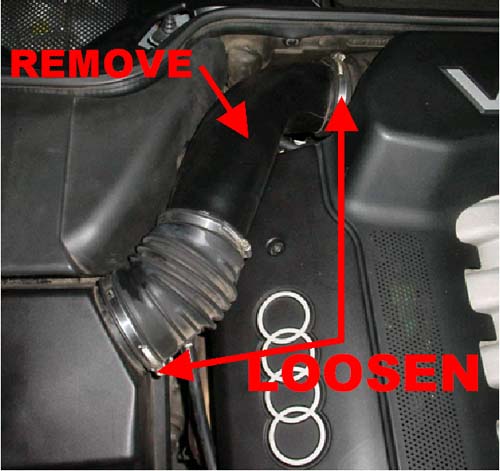
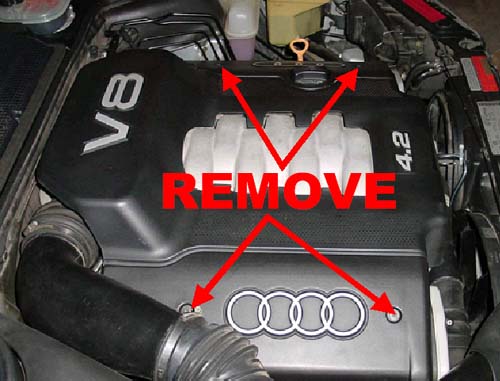
Remove the engine plastic and other interference. See pictures below for details.
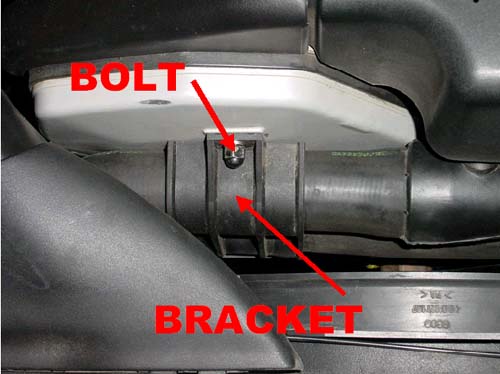
Remove radiator hose support.
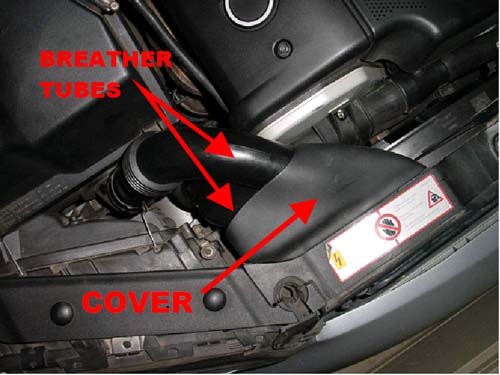
Remove upper radiator hose from engine. DO NOT DISCONNECT SMALL HOSE AT TOP OF UPPER RADIATOR HOSE! If you do, you will most likely break it. Just remove the upper radiator hose from the block (2 places) and from the radiator. Place the hose on top of the engine with the small radiator hose in the middle attached.
Remove the lower radiator hose from the block. No need to disconnect it from the radiator, it will act as a stand pipe and prevent coolant from leaking all over. However, you'll need to snake it around the torque support when pulling the front end.
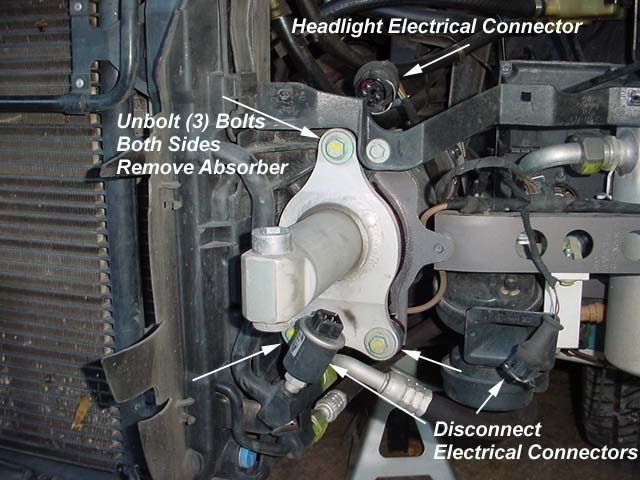
Disconnect Electrical Connections
Disconnect the following connections (you may have to cut some tie wraps on the driver's side below the headlight):
Headlight connectors (push metal piece to disconnect and pull)
Ambient temperature sensor in front of radiator (push metal piece to disconnect and pull)
A/C connector just in front of LH bumper shock absorber (push metal piece to disconnect and pull)
Radiator electrical connector just above lower radiator hose (it just pulls off, try prying a little with a screwdriver)
Corner marker lights (wait until you pull the front end and just turn them and remove)
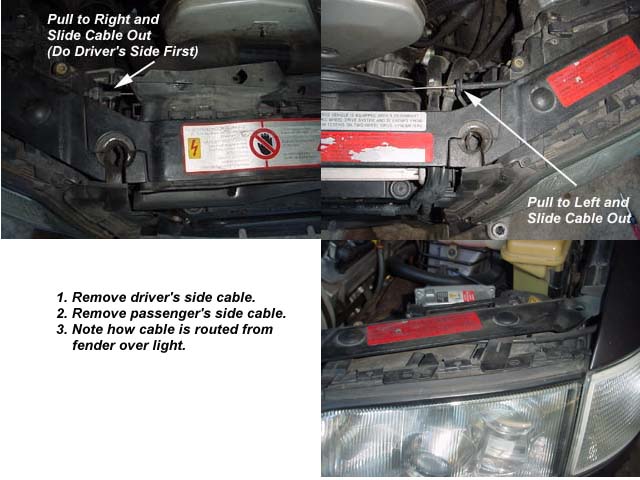
Disconnect Hood Latch Cable
There is no need to unbolt the hood latch cable, just pry it out using the picture below.
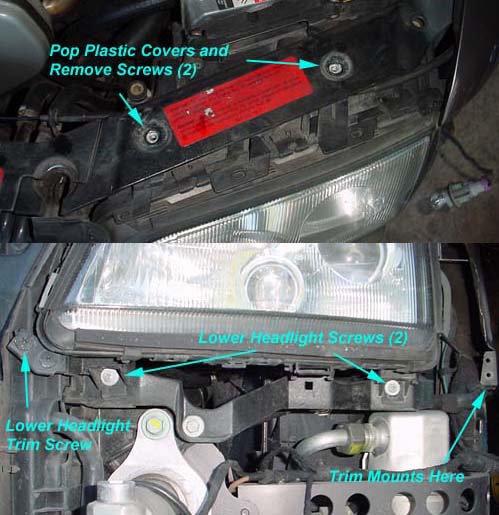
Remove Driver Side Headlight
Remove the trim below the headlights by unscrewing the small phillips head screw on the inboard side of the headlight (both sides). Pull the trim out towards front.
Remove driver's side headlight by unscrewing the four phillips head screws in the picture below. When reinstalling, tighten the top two first, then the bottom two. The corner marker will come with it, no need to disconnect.
Unbolt Radiator Support
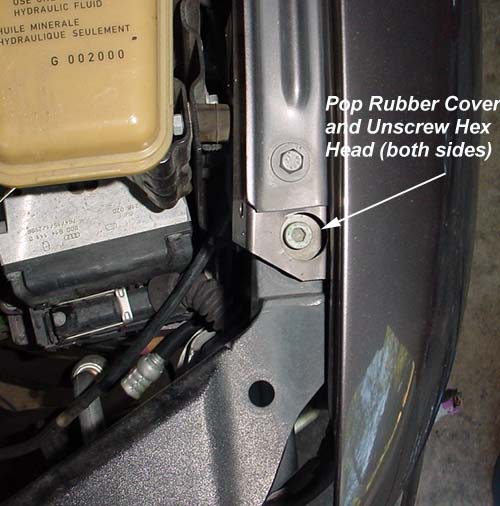
Prior to unbolting the front bumper shock absorbers, MARK THE OUTLINE WITH A PERMANENT MARKER! This will give you a good idea where the front end should sit when it goes back on.
Unbolt the radiator support by removing the two 6mm hex heads in the fender. Pop the plastic piece above them and you'll have access to them. Remove the bolts from the fender otherwise it will get caught up on them when pulling it out.
Remove the six bolts from the bumper shock absorber mounts, remove bumper shock absorbers. To clear the driver's side absorber, turn 90 degrees or so to get past the electrical connector.
Note the permanent marker markings outside of the
bumper absorber to show where it was prior to removal.
Place a dolly or other suitable support under the front end. Using a mechanics dolly works well with a piece of wood on it. Pull the front end out, and wiggle it so the passenger side comes out further than the driver's side. The headlight frame will just clear the driver's side fender.
Installation Notes
When installing the radiator assembly, snake the lower hose back around the torque support to get it in place.
Once lifted back in place, start the hex head fender bolts to hold it in place. Tighten these two bolts after tightening the bumper shock absorber bolts.
The radiator support must be jacked up to get it back properly lined up. To do this, use a jack and a piece of wood under the radiator, slightly support it, get all six bumper shock absorber bolts started, jack it up (look at the markings you made as a guide), and then tighten the bolts down. Jack it up as high as possible without putting too much stress on it. If you do not do this, it will sit too low and the bumper won't clear it.
Tighten the upper headlight screws before the lower headlight screws, this will pull it into place. Use the old markings as a guide.
Installation is reverse of removal.
Evan and Julia Waterloo say front end removal is easy!